We will implement a water flow meter by connecting a water flow sensor to the ESP8266 microcontroller. The data will be sent to a remote server and displayed in the ThingSpeak service.
The Idea
Connect the YF-S402 sensor to the ESP8266 NodeMCU microcontroller. You need to read the sensor data, calculate the water flow rate, and the volume of liquid. Transmit the obtained result over the internet to the thingspeak server and display it visually on the website.
The main components for the project
Why ESP8266?
ESP8266 has several advantages for use in IoT (Internet of Things) projects:
- Built-in Wi-Fi: ESP8266 comes with a built-in Wi-Fi module, allowing devices to wirelessly connect to the internet or a local network.
- Low cost: The ESP8266 microcontroller is quite affordable, making it accessible for a wide range of projects, from home automation to industrial solutions. Low power consumption: ESP8266 consumes relatively little power, making it an ideal choice for battery-powered devices.
- Small size: The ESP8266 microcontroller has a compact size, making it an easy-to-embed platform for various devices.
- Support for various network protocols: ESP8266 supports various network protocols such as TCP/IP, UDP, HTTP, MQTT, etc., allowing developers to create diverse IoT devices with different functionalities.
- Large community and support: ESP8266 has a large community of developers actively creating new libraries, projects, and ideas for using the microcontroller in various applications.
Overall, ESP8266 is a powerful and efficient microcontroller with built-in Wi-Fi, making it an ideal choice for developing a variety of IoT devices and smart systems. In our case it’s a water flow meter.
What is the purpose of a water flow sensor?
A water flow sensor is an important component in water consumption monitoring and control systems. Here are a few main reasons why these sensors are used:
- Efficient water consumption management: Flow sensors allow for the precise measurement of the amount of water passing through a system. This enables users to monitor their consumption and manage it effectively, reducing losses and expenditures.
- Detection of leaks: Flow sensors can detect unusual or excessive water usage, which may indicate leaks or issues in the water supply system. This allows for the timely identification of problems and avoidance of significant water losses.
- Recording water usage for cost calculation: In some cases, water flow sensors are installed to accurately measure the amount of water consumed by a user. This can be important for calculating the cost of water consumption or for internal accounting purposes.
- Automation of irrigation systems: In automatic irrigation systems for agriculture or gardening, water flow sensors are used to precisely measure the amount of water supplied to plants. This allows for optimal adjustment of irrigation schedules, ensuring that plants receive the necessary amount of water.
Therefore, water flow sensors help efficiently manage water consumption, detect leaks and issues in the water supply system, record usage for cost calculation, and automate plant irrigation systems.
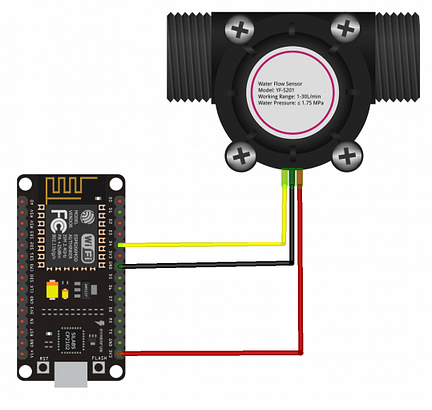
Water flow sensor connection diagram
The water flow sensor needs to be connected to the D4 output (GPIO2) on the ESP8266 microcontroller board. The connection diagram is provided below. You may need to disconnect this contact during the upload of the program code into the microcontroller’s memory. Keep this in mind in case any upload errors occur.

Software
What is ThingSpeak?
ThingSpeak is a free cloud service that allows you to store, analyze, and visualize data from IoT (Internet of Things) devices. This service was developed by MathWorks and is designed to simplify working with data from IoT devices and create interactive graphs and charts to display this data.
The main features and capabilities of the ThingSpeak service include:
- Data storage: ThingSpeak provides the ability to store data from IoT devices in the form of tables, allowing you to keep a history of data and use it for further analysis.
- Data visualization: The service provides an interface for creating interactive graphs, charts, and maps to display data from IoT devices. This allows users to quickly and conveniently analyze and display data.
- Events and notifications: ThingSpeak supports event settings and notifications based on conditions, allowing you to automatically send messages or take actions when certain data conditions are met.
- Openness and integration: ThingSpeak service supports openness and has a wide range of integrations with various IoT devices and platforms. It also supports an API for convenient access to data and management.
Overall, the ThingSpeak service allows users to easily store, visualize, and analyze data from IoT devices, making it a popular tool for developing and managing IoT projects.
Channel setup in ThingSpeak
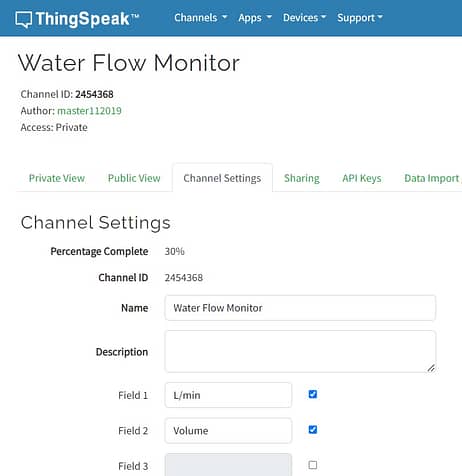
1. To begin, you need to create and log in to your ThingSpeak account. Then, you need to create a new Channel to receive data from the microcontroller. When creating, fill in the fields:

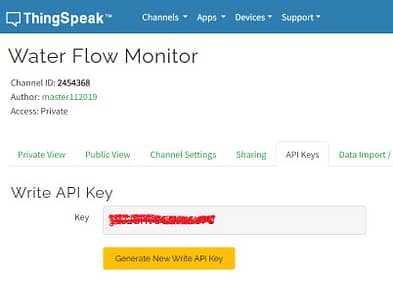
2. Obtain an API key for further use when sending data from the sensor:

We will also need the Channel ID parameter.
3. Next, we move to the “Privat View” section and create panels for displaying data.

The water flow rate panel was created using Add Visualizations, while the volume meter panel was created using Add Widgets.
Installing the ThingSpeak Library
To operate our IoT device, we need the ThingSpeak library. You can install it in the Arduino IDE by going to Tools -> Manage Libraries… and searching for “thingspeak.” Then, click the install button.
Programming Code
The complete program code for the project implementing water flow monitoring can be downloaded from GitHub at this link. You will need to replace the values with your own parameters for the Wi-Fi network, channel ID, and ThingSpeak API key. Additionally, you will likely need to calibrate the calibration factor for your specific water flow sensor model.
Water flow meter
As mentioned earlier, water flow meter is implemented using the ThingSpeak service. The developed device, as well as the results of its operation, can be seen in the images below.


You might also be interested in my other projects. For example, a home weather station based on ESP8266 NodeMCU.
