Want to know how much and when your cat eats — without guessing? In this article, we’ll build a simple and accurate smart cat bowl scale based on an ESP32-C3 dev board with a built-in OLED display and a load cell + HX711 amplifier module. We’ll add a Tare button to zero the weight and a calibration mode to compute your own accuracy factor.
This will be a three-part series. Today we’re working on Part 1. By the end, you’ll get stable readings in grams прямо on the OLED — a solid foundation for Part 2 (sending data to Telegram and building a web dashboard) and Part 3 (automatic calculation of how much food was actually eaten, with smart notifications).
Table of Contents
What we’ll build
- A scale showing MASS(g) on the ESP32-C3 built-in OLED.
- Tare: one-press zeroing with a button.
- Calibration: a mode to calculate your own calibration/accuracy factor.
- Stable readings (averaging), and clamping negative values to 0.
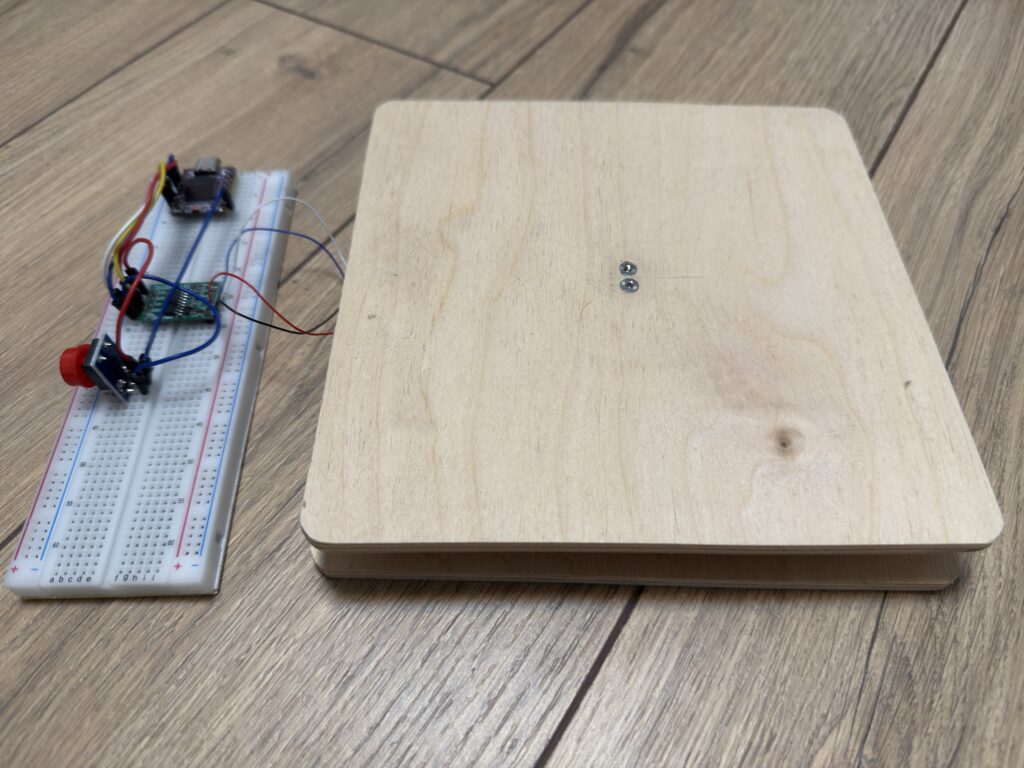
- A mechanical platform for the bowl: two plywood sheets 17.5 × 17.5 cm, 6 mm thick each.
- Next: expand into an IoT system with Telegram + web dashboard (Part 2) and teach the algorithm to calculate how much the cat actually ate with smart alerts (Part 3).
Components (BOM)
Electronics
- ESP32-C3 dev board with a built-in OLED
- HX711 (load cell amplifier), 3.3 V supply
- Load cell 1–5 kg — choose based on bowl weight + margin (I use a 2 kg sensor)
- Momentary button module for Tare
- Breadboard / wires / mounting hardware, 5 V USB power (or a battery — optional)
Bowl platform (mechanics)
- 2 plywood sheets 17.5 × 17.5 cm, 6 mm thick each:
- top sheet — support platform for the bowl
- bottom sheet — base where the load cell is mounted
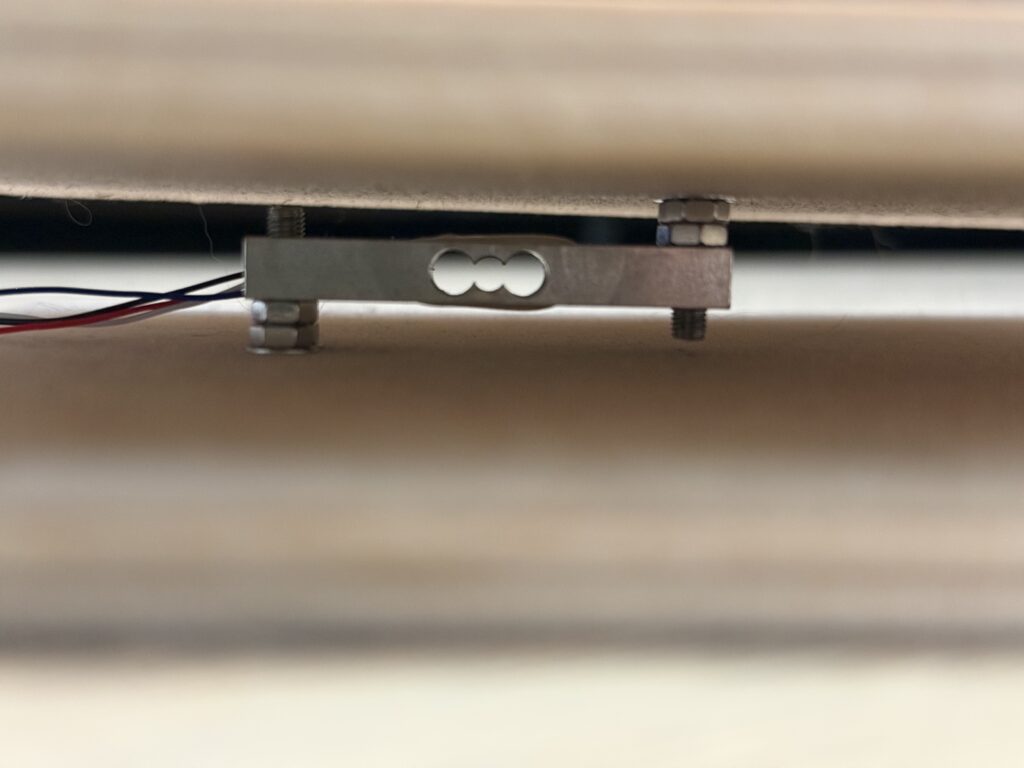
- Mounting: M3 (I use M3 for a 47×10×6 mm load cell) / M4 screws, washers, nuts, anti-vibration rubber feet
Platform recommendations
- Make the assembly rigid: no play, no bending.
- Mount the load cell so the weight transfers through a single point (on the side of the sensitive element).
- Critical: the top plate must rest through the load cell, not bypass it through other support points.
Wiring
Because the OLED is built-in, no separate OLED wiring is needed — we use the board’s standard internal I²C lines.
Pins (ESP32-C3)
- HX711: DT → GPIO2, SCK → GPIO1, VCC → 3.3V, GND → GND
- Built-in OLED (SSD1306 72×40, I²C): internal connection SDA = GPIO5, SCL = GPIO6
- Tare button module: SIG/OUT → GPIO3, GND → GND, VCC → 3.3V
Load cell → HX711 wiring
- red: E+
- black: E-
- white: A-
- blue: A+
Electrical tips
- Keep wires from the load cell to HX711 as short as possible.
- Use a common ground (GND) for all modules.
- Place HX711 closer to the load cell; place the OLED board where it’s convenient to look at.
Environment setup
You can find the Arduino IDE setup instructions for working with the ESP32 HERE.
Firmware overview
In setup() we initialize the HX711 and the built-in OLED (via U8g2).
A CALIBRATION_MODE switch:
true— show RAW VAL (raw readings) to calculate the factorfalse— normal mode: applyCALIBRATION_FACTOR, runtare(), and show grams in a large font
Tare button:
- detect a press edge (HIGH → LOW) and show “TARING…” / “TARED!” on the display
Refresh:
- update the screen every ~200 ms; clamp negative values to 0 g
Full sketch
#include "HX711.h"
#include <U8g2lib.h>
#include <Wire.h> // Required for I2C

// ===============================================
// ESP32-C3 CONFIGURATION
// ===============================================

// HX711 uses GPIO 1 and 2 to avoid conflicts with the OLED on GPIO 5 and 6.
const int LOADCELL_DOUT_PIN = 2; // DT -> GPIO 2
const int LOADCELL_SCK_PIN = 1;  // SCK -> GPIO 1
// Tare button - using GPIO 3
const int TARE_BUTTON_PIN = 3;

HX711 scale;

// Built-in 72x40 OLED (SSD1306) is connected via I2C inside the board.
// U8g2 constructor with explicit I2C pins: SCL=6, SDA=5.
U8G2_SSD1306_72X40_ER_F_HW_I2C u8g2(U8G2_R0, U8X8_PIN_NONE, /* clock=*/ 6, /* data=*/ 5);


// ===============================================
// CALIBRATION
// ===============================================

// Set to 'true' to determine the calibration factor. Set back to 'false' after you calculate it.
const bool CALIBRATION_MODE = false;

// SET YOUR FACTOR HERE (used when CALIBRATION_MODE = false)
// Define your own value after calibration.
const float CALIBRATION_FACTOR = 995700.0;

// Global variable to track the button state
bool lastButtonState = HIGH;

void handleButton() {
  bool currentButtonState = digitalRead(TARE_BUTTON_PIN);

  // 1. Detect a BUTTON PRESS (transition from HIGH to LOW)
  if (lastButtonState == HIGH && currentButtonState == LOW) {
    // Button pressed
    u8g2.clearBuffer();
    u8g2.setFont(u8g2_font_7x13_tf);
    u8g2.drawStr(0, 20, "TARING...");
    u8g2.sendBuffer();

    // Perform zeroing (tare)
    scale.tare(20);

    u8g2.clearBuffer();
    u8g2.setFont(u8g2_font_7x13_tf);
    u8g2.drawStr(0, 20, "TARED!");
    u8g2.sendBuffer();
  }

  lastButtonState = currentButtonState;
}

void setup() {
  Serial.begin(115200);

  // Use INPUT_PULLUP because the button is typically connected to GND.
  pinMode(TARE_BUTTON_PIN, INPUT_PULLUP);

  // 1. Initialize HX711
  scale.begin(LOADCELL_DOUT_PIN, LOADCELL_SCK_PIN);

  if (!scale.is_ready()) {
    Serial.println("\n\n!!! ERROR: HX711 not found. Check wiring to GPIO 1 and 2 !!!\n");
  }

  // 2. Initialize OLED
  u8g2.begin();
  u8g2.setFont(u8g2_font_6x10_tf);
  u8g2.clearBuffer();
  u8g2.drawStr(0, 10, "Starting...");
  u8g2.drawStr(0, 25, "HX711 Init...");
  u8g2.sendBuffer();

  // 3. Scale setup
  if (CALIBRATION_MODE) {
    scale.set_scale(1.0);
    scale.tare(20);

    Serial.println("\n--- CALIBRATION MODE ---");
    Serial.println("1. Tare completed.");
    Serial.println("2. Place a known weight.");

    u8g2.clearBuffer();
    u8g2.drawStr(0, 10, "CALIB MODE");
    u8g2.drawStr(0, 25, "SEE SERIAL");
    u8g2.sendBuffer();

  } else {
    // Normal (weighing) mode
    scale.set_scale(CALIBRATION_FACTOR);
    scale.tare(20);

    Serial.println("\n--- SCALE MODE ---");

    u8g2.clearBuffer();
    u8g2.setFont(u8g2_font_7x13_tf);
    u8g2.drawStr(0, 10, "WEIGHT:");
    u8g2.sendBuffer();
  }
}

void loop() {
  // 1. Handle the Tare button
  handleButton();
  if (!scale.is_ready()) {
    u8g2.clearBuffer();
    u8g2.setFont(u8g2_font_6x10_tf);
    u8g2.drawStr(0, 10, "HX711 ERR");
    u8g2.sendBuffer();
    delay(1000);
    return;
  }

  if (CALIBRATION_MODE) {
    // ------------------------------------
    // Logic for CALIBRATION MODE
    // ------------------------------------
    long raw_value = scale.get_value(5);
    Serial.print("Raw value: ");
    Serial.println(raw_value);

    // Display the raw value on the OLED
    u8g2.clearBuffer();
    u8g2.setFont(u8g2_font_7x13_tf);
    u8g2.drawStr(0, 10, "RAW VAL:");

    char raw_str[15];
    sprintf(raw_str, "%ld", raw_value);

    u8g2.setFont(u8g2_font_6x10_tf);
    u8g2.drawStr(0, 25, raw_str);
    u8g2.sendBuffer();

    delay(500);

  } else {
    // ------------------------------------
    // Logic for SCALE MODE (OLED output)
    // ------------------------------------

    float weight_kg = scale.get_units(5);
    int grams = (int)(weight_kg * 1000);

    if (grams < 0) {
        grams = 0; // Set to 0 if the value is negative
    }

    Serial.print("Weight: ");
    Serial.print(grams);
    Serial.println("g");

    // Output to the OLED display
    u8g2.clearBuffer();

    // Top line: Title
    u8g2.setFont(u8g2_font_7x13_tf);
    u8g2.drawStr(5, 10, "MASS(g):");

    // Main value (GRAMS)
    char grams_str[10];
    sprintf(grams_str, "%d", grams);

    u8g2.setFont(u8g2_font_fub11_tf);
    u8g2.drawStr(20, 25, grams_str);

    u8g2.sendBuffer();

    delay(200);
  }
}
How to calibrate
- Calibration mode: set
CALIBRATION_MODE = trueandscale.set_scale(1.0). - Tare (zeroing):
scale.tare(20)— this resets the scale to zero. - Get raw value: read raw output with no load on the platform.
- Weigh a reference: place a known weight (for example 100 g) and record the raw value under load.
- Calculate the factor (
CALIBRATION_FACTOR):- Formula: Factor = raw_value_for_0.1kg / 0.1 (i.e., divide the raw value by the reference weight in kg)
- Sign note: sometimes the factor must be negative — it depends on the load cell wiring and orientation.
Accuracy tips
- Use an average of 5–10 readings.
- Let HX711 stabilize for 1–3 minutes after powering up.
- Don’t touch the platform during tare and weighing.
- Watch the mechanics: rigid base, no play.
Result – a smart cat bowl scale
On the OLED you’ll see the MASS(g): header and the current weight in large digits. The Serial Monitor also prints grams. Negative readings are clamped to 0 g (useful when the bowl/platform slightly “shifts”).