If you’re looking to integrate OpenAI’s ChatGPT into your own projects, you’ll need an API key. This key acts as a secure credential that allows your application to communicate with OpenAI’s servers and send requests to the ChatGPT model.
In this guide, we’ll walk you through everything you need to know about API keys, including how to generate and secure your ChatGPT API key for OpenAI’s platform. Follow this step-by-step guide to access, manage, and protect your API key for AI-powered applications.
Table of Contents
What is a ChatGPT API Key?
An API key is a unique identifier that grants access to OpenAI’s API services. It ensures that only authorized users can send requests and receive responses from ChatGPT. Whether you’re building a chatbot, automating tasks, or experimenting with AI-powered applications, the API key is an essential component.
Why Do You Need an API Key?
The API key is required for:
- Sending queries to the ChatGPT model.
- Receiving AI-generated responses in your applications.
- Tracking usage and managing costs associated with API calls.
- Ensuring secure and authenticated access to OpenAI’s resources.
Without an API key, you won’t be able to access OpenAI’s API endpoints.
How to Get a ChatGPT API Key
1. Access OpenAI’s Platform
First, navigate to platform.openai.com. Log in using the email address associated with your OpenAI (ChatGPT) account.

2. Navigate to the API Section
Once logged in, look for the “Start Building” button and click it. If you haven’t already, you may need to create an organization to proceed.
Inside the platform, you’ll find various resources, including:
- A Quickstart Guide to help you make your first API request.
- Comprehensive documentation on OpenAI’s models and pricing.
- Sample queries in multiple programming languages to help you get started.
3. Check Your Account Credits
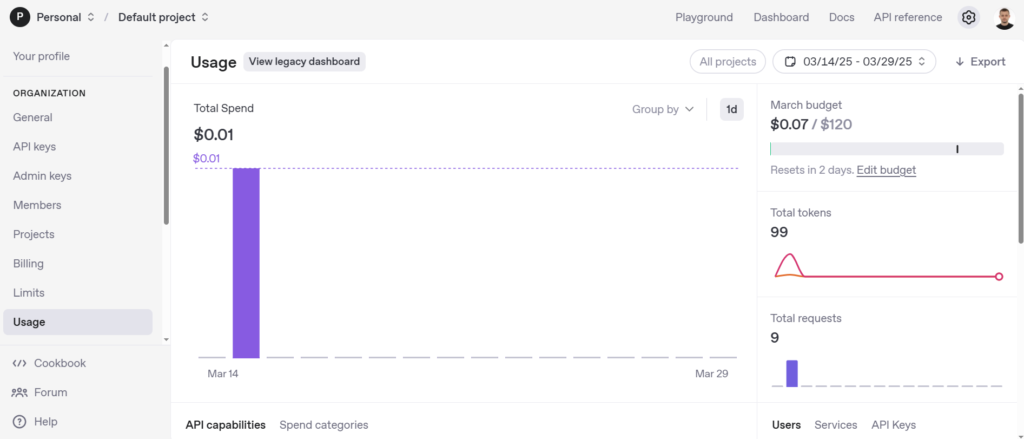
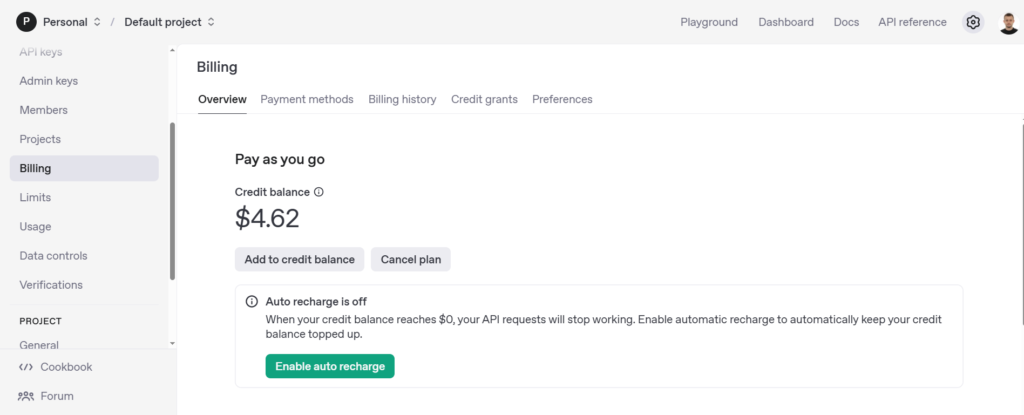
Before generating an API key, ensure your account has sufficient credits for API requests. To do this:
- Go to the Settings tab and select Usage.


- If you’re a new user, you might have free trial credits. However, if your credits have expired, you have two options:
- Create a new OpenAI (ChatGPT) account for another free trial period.
- Top up your balance with at least $5 to enable API access.

4. Generate Your API Key
Once your account is ready, follow these steps to create your API key:
- Navigate to the Dashboard.
- Click on API Keys in the left-hand menu.
- Select Create new secret key.
- Assign a name to your key (for easier identification), generate it, and securely store it.


🚨 Important: Your API key is private! Never share it publicly, as it grants access to your OpenAI API usage.
How to Use Your API Key with cURL
Once you have your API key, you can use it to make requests to OpenAI’s API. Below is a simple example using curl to send a request to the ChatGPT API:
export OPENAI_API_KEY="your-api-key-here"curl https://api.openai.com/v1/chat/completions \
-H "Content-Type: application/json" \
-H "Authorization: Bearer $OPENAI_API_KEY" \
-d '{
"model": "gpt-4",
"messages": [{"role": "system", "content": "You are a helpful assistant."},
{"role": "user", "content": "Hello!"}],
"temperature": 0.7
}'Explanation
curl:- This is the command-line tool used for making HTTP requests. In this case, we are using
curlto send a request to the OpenAI API.
- This is the command-line tool used for making HTTP requests. In this case, we are using
https://api.openai.com/v1/chat/completions:- This is the URL to which the request is sent. It points to the endpoint for creating a chat with OpenAI’s models (such as GPT-3 or GPT-4).
-H "Content-Type: application/json":- This is a header that specifies the type of content being sent. In this case,
application/jsonmeans the request body will be in JSON format.
- This is a header that specifies the type of content being sent. In this case,
-H "Authorization: Bearer $OPENAI_API_KEY":- This is another header that passes your API key for authentication.
$OPENAI_API_KEYis an environment variable containing your actual API key. - The
Bearerkeyword indicates that the request is using a token (API key) for authorization.
- This is another header that passes your API key for authentication.
-d '...':- The
-dflag sends the data in the request body. This body contains the parameters for ChatGPT. - The content of the request body (in JSON format) looks like this:
- The
Request Body
"model": "gpt-4":- Specifies which model you want to use. In this case, it’s GPT-4, one of OpenAI’s most powerful models.
"messages": [...]:- This is an array of messages that defines the interaction between the user and the system.
"role": "system"– indicates the role of the system (i.e., providing context for the model). In this example, it tells the model that it should be a “helpful assistant.”"role": "user"– indicates the role of the user interacting with the model. In this case, the user simply types “Hello!”.
"temperature": 0.7:- This parameter controls the randomness of the response. The higher the
temperature, the more random the responses are (though they may be less accurate). A value of 0.7 strikes a balance, producing creative yet coherent responses.
- This parameter controls the randomness of the response. The higher the
Request Explanation
This request sends a message to the GPT-4 model, where the system is instructed to be a “helpful assistant” and the user sends a “Hello!” message. The model will generate a response based on this context. The temperature setting at 0.7 ensures that the response is a good mix of creativity and coherence.
Why Use export OPENAI_API_KEY?
Instead of hardcoding your API key directly in the curl command, we use export OPENAI_API_KEY to store the key as an environment variable. This approach has several benefits:
- Security: It prevents your API key from being exposed in command history or shared accidentally.
- Convenience: Once set, you can reuse the key in multiple requests without retyping it.
- Portability: You can use the same environment variable across different scripts and applications.
Replace your-api-key-here with your actual API key. This command first sets an environment variable for the API key, then uses curl to send a message to the ChatGPT model and receive a response.

Best Practices for Using Your API Key
To keep your API key secure and avoid unauthorized access, follow these best practices:
- Store it securely: Save the key in environment variables or a secure vault rather than hardcoding it in your scripts.
- Restrict access: Use OpenAI’s security settings to limit API key usage to specific domains or applications.
- Monitor usage: Regularly check your Usage Dashboard to track API calls and prevent unexpected charges.
- Rotate keys periodically: If you suspect any security risks, revoke the old key and generate a new one.
Final Thoughts
The ChatGPT API key is your gateway to integrating AI-powered interactions into your applications. By following the steps above, you can easily generate your own API key and start building powerful AI-driven solutions.
Need more help? Check OpenAI’s official API documentation for additional resources and troubleshooting tips.
You might also be interested in my post Does OpenCV work on Raspberry Pi 4?
