In the realm of the internet, there are numerous exciting Raspberry Pi projects utilizing the OpenCV library. In this article, I essentially aim to replicate one of such projects focused on object recognition using a Raspberry Pi camera while also augmenting it with the capability to notify the presence of a specific object in the frame through a Telegram bot.
Installing OpenCV on Raspberry Pi
To install the OpenCV library, you need to update the operating system and expand swap:
sudo apt-get update && sudo apt-get upgradesudo nano /etc/dphys-swapfileIn dphys-swapfile you need to change CONF_SWAPSIZE = 100 to CONF_SWAPSIZE=2048.
sudo apt-get install build-essential cmake pkg-config

sudo apt-get install libjpeg-dev libtiff5-dev libjasper-dev libpng12-dev

sudo apt-get install libavcodec-dev libavformat-dev libswscale-dev libv4l-dev

sudo apt-get install libxvidcore-dev libx264-dev

sudo apt-get install libgtk2.0-dev libgtk-3-dev

sudo apt-get install libatlas-base-dev gfortran

sudo pip3 install numpy

wget -O opencv.zip https://github.com/opencv/opencv/archive/4.4.0.zip

wget -O opencv_contrib.zip https://github.com/opencv/opencv_contrib/archive/4.4.0.zip

unzip opencv.zip

unzip opencv_contrib.zip

cd ~/opencv-4.4.0/

mkdir build && cd build
If the installation of the libpng12-dev package fails, try libpng-dev instead.
cmake -D CMAKE_BUILD_TYPE=RELEASE -D CMAKE_INSTALL_PREFIX=/usr/local -D INSTALL_PYTHON_EXAMPLES=ON -D OPENCV_EXTRA_MODULES_PATH=~/opencv_contrib-4.4.0/modules -D BUILD_EXAMPLES=ON ..

make -j $(nproc)
The execution of the last command may take a significant amount of time, so be prepared for that. If, for some reason, an error occurs, calmly restart the command, and the installation will resume from where it left off. Now, let’s proceed to execute the following commands:
sudo make install && sudo ldconfig

sudo reboot
At this stage, you can revert the swap size to its original value by setting CONF_SWAPSIZE = 100. Now, you need to download the files from the “Object_Detection_Files.zip.” These files include a library trained to recognize objects using the Coco Library.
Testing the functionality of the object detection library now.
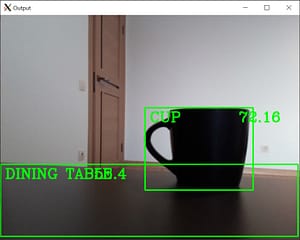
After downloading the “Object_Detection_Files.zip” files, you’ll need to extract them and move them to the /home/pi/Desktop directory, or you can change the path to the library files in your Python script. Specifically, we are interested in the “object-ident.py” script. When you run it, you should see something like this:

Setting up a Telegram bot for Raspberry Pi
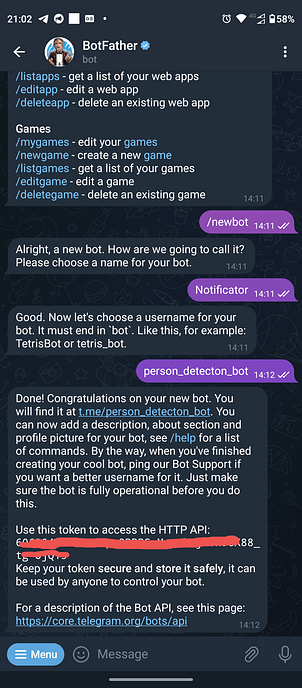
We need to open our Telegram app and search for “@botfather” (this is a built-in Telegram bot that allows you to create your custom bots). Next, you should send the command “/newbot,” enter the bot’s name, and save the bot token. We’ll need this token for the Python script. In my case, the process of creating a Telegram bot looked like this:

Python script for sending messages from Raspberry Pi via Telegram bot
In Telegram, each chat has a chat ID, and we need this chat ID to send Telegram messages using a Python script. To obtain your chat ID, you can send any message to your bot, and then run the following script:
import requests
TOKEN = "ТОКЕН НАШОГО ТЕЛЕГРАМ БОТА"
url = f"https://api.telegram.org/bot{TOKEN}/getUpdates"
print(requests.get(url).json())
Please note that if you haven’t sent a message to your Telegram bot, the script’s results may be empty.
Copy and paste your chat ID for the next step. Also, copy and paste 1) your Telegram bot token and 2) your chat ID from the previous two steps into the following Python script. (And customize the text of your message as well):
import requests
TOKEN = "TOKEN OF YOUR BOT"
chat_id = "CHAT ID"
message = "Person entered the room"
url = f"https://api.telegram.org/bot{TOKEN}/sendMessage?chat_id={chat_id}&text={message}"
print(requests.get(url).json()) # this sends the message
Notification of a recognized object via Telegram
To modify the object-ident.py script to send a Telegram message when a person is detected in the frame, you can add the following code (you can download the complete code from your source):
    isPerson = False
    while True:
        success, img = cap.read()
        result, objectInfo = getObjects(img,0.45,0.2)
        for obj in objectInfo:
          if "person" in obj:
            isPerson = True
        if isPerson:
          subprocess.run(["python", "send-message-bot.py"])
          isPerson = False
        cv2.imshow("Output",img)
        cv2.waitKey(1)
Essentially, we’re detecting the ‘person’ object in Python and using subprocess to run a script that sends a message through a Telegram bot. This code is provided as a basic and rather primitive example, so feel free to customize it to suit your needs 😉
All to a heap
Checking the operation of our script and get:

And accordingly, a message appears in our telegram:

The project described here is based on the compilation of several projects, the links to which I diligently provide below 🙂 Thank you for your time, and I would welcome comments regarding your experience with Raspberry Pi and OpenCV. You might also find my publication about mining on Raspberry Pi interesting.

The following materials were useful to me:
1. https://core-electronics.com.au/guides/object-identify-raspberry-pi/#Set
2. https://medium.com/codex/using-python-to-send-telegram-messages-in-3-simple-steps-419a8b5e5e2
3. https://www.w3docs.com/snippets/python/how-can-i-make-one-python-file-run-another.html