Instead of an Introduction
A simple home weather station on ESP8266 NodeMCU, weather forecast, and internet access – to begin with, let me explain what exactly I implemented in the project described in this publication. An elementary home weather station that displays the current temperature, humidity, atmospheric pressure, and approximate altitude above sea level, accessible through both local Wi-Fi network and the internet, can be easily realized with the ESP8266 NodeMCU microcontroller. One of the biggest advantages of this microcontroller is the built-in Wi-Fi module, allowing for Internet of Things (IoT) experimentation without leaving home. Additionally, within this project, we will fetch weather forecast information and display it alongside sensor readings on a web server implemented on the ESP8266.
Hardware Used:
- ESP8266 microcontroller (ESP-12E NODEMCU model);
- BMP280 atmospheric pressure and temperature sensor;
- Digital thermometer DS18B20;
- DHT11 air temperature and humidity sensor;
- Breadboard, wires.
I won’t delve into the setup and programming of the ESP8266, as the internet is full of various instructions on how to do it. I programmed my NodeMCU using the Arduino IDE. I also won’t go into detail about connecting the necessary libraries. This publication is a slightly refined compilation of several interesting articles, the references to which can be found below. I added some useful features, such as accessing sensor readings over the internet and weather forecasting using API calls to a service that provides access to worldwide weather data.
Let’s break down the process of building the weather station into several stages:
- Connecting sensors to the microcontroller;
- Programming the microcontroller;
- Connecting the microcontroller to the local Wi-Fi network and displaying sensor readings by accessing the ESP8266 via its IP address;
- Opening access to sensor readings from the internet;
- Displaying the weather forecast.
Connecting Sensors to the Microcontroller
Both BMP280, DS18B20, and DHT11 are suitable as temperature sensors, but they have different measurement accuracies. Therefore, I used DS18B20 directly to determine air temperature, DHT11 for measuring air humidity, and BMP280 module for determining atmospheric pressure and altitude (calculated from temperature and pressure). The connection scheme becomes clear when looking at the program code.
BMP280 Sensor –> Microcontroller:
#define BMP_SCK D1
 #define BMP_MISO D4
 #define BMP_MOSI D2
 #define BMP_CS D3
Digital Thermometer DS18B20 –> Microcontroller:
#define ONE_WIRE_BUS D5
DHT11 Sensor –> Microcontroller:
uint8_t DHTPin = D6;
Programming the ESP8266 Microcontroller
For programming the weather station, I used the following libraries:
#include <Arduino_JSON.h>
#include <ESP8266WebServer.h>
#include <Wire.h>
#include <SPI.h>
#include <Adafruit_Sensor.h>
 #include <Adafruit_BMP280.h>
 #include <ESP8266WiFi.h>
 #include <ESP8266HTTPClient.h>
 #include <WiFiClient.h>
 #include <OneWire.h>
 #include <DallasTemperature.h>
 #include "DHT.h"
The complete source code of the program can be found at the link at the end of the publication. The code is ready to use, but don’t forget to replace the Wi-Fi network name and password for connecting the microcontroller, the coordinates of your city, and your API key for the weather forecast:
const char* ssid = "REPLACE_WITH_YOUR_SSID";
 const char* password = "REPLACE_WITH_YOUR_PASSWORD";
// Replace the next line with your API Key
#define ONECALLKEY “REPLACE_WITH_YOUR_API_KEY”
// Sample Lat and Lon for Lviv, UA
float myLatitude = 49.8383; //<———————in range to use GPS coordinates
float myLongitude = 24.0232; // Coordinates for Lviv, UA. Change these for your city
Connecting the ESP8266 Microcontroller to the Local Wi-Fi Network and Displaying Readings by IP Address
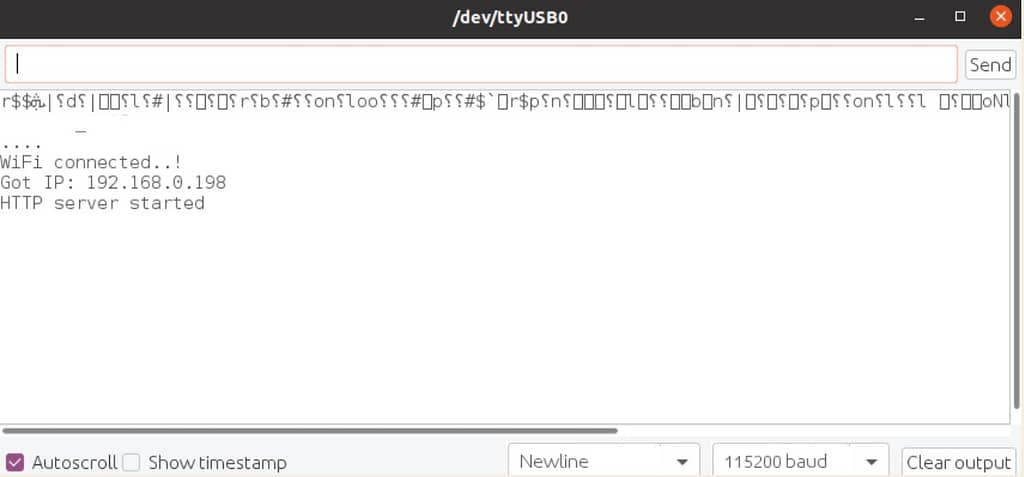
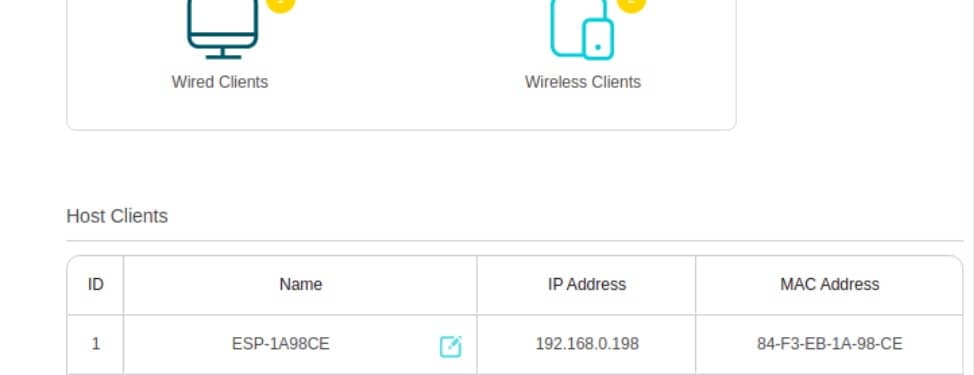
After connecting all the sensors and uploading the program code to the microcontroller’s memory, the weather station should automatically connect to the Wi-Fi network specified in the SSID. In most cases, the router will dynamically assign a local IP address to the microcontroller using a DHCP server. You can find out this IP address in two ways: open the Serial Monitor (if using Arduino IDE) or check the list of clients in the admin console of your router.
Serial Monitor in Arduino IDE:

IP address of the microcontroller in the Wi-Fi router settings:
 If everything is done correctly, by accessing the obtained IP address from any device connected to our local Wi-Fi network through a browser, we should see something like:

Opening Access to Sensor Readings from the Internet
Now we make our weather station accessible from the internet. If your provider has not assigned a static IP address, which is usually the case, you’ll need to use services like DynDNS or NoIP. In my case, I used NoIP. These services are necessary to bind the port we opened on the router to the IP address of the weather station under a static name.
To begin with, you need to open port 80 for the IP address of the microcontroller in the router settings. In routers from different manufacturers, this process may vary, as well as the names of menu items in the settings, but typically, it will be something like Port Forwarding or Virtual Servers. You can simply Google or refer to the manual of your specific network equipment model. In my case with TP-Link, it looks like this:

Next, we register on the NoIP service and create a test domain for our weather station. In the IP/Target field, the network address of your router will be displayed:

Thanks to the performed actions, now we can access the created domain name from the Internet from anywhere in the world and get the readings collected by our simple home weather station. It looks something like this:
 Displaying the Weather Forecast
Fetching the weather forecast from the Internet can be easily implemented using services like OpenWeather. After registering on the site, you can obtain an API key, which allows making HTTP requests and receiving information from the server about the current weather conditions and the forecast. You can use the default key or generate a new one:

More details about the OpenWeatherMap API and query parameters can be found in their documentation. OpenWeatherMap provides the ability to make requests to their API for free, with a limited number of calls per day. The limits can be expanded with a paid subscription, but honestly, the free tier is sufficient for home experiments (60 calls per minute). You can obtain both current weather and a detailed forecast.
By the way, there are other libraries for working with their API, but the method described here turned out to be the simplest for me personally. If you did it differently, I would be very interested to read about it in the comments. In general, how I implemented fetching the weather forecast and displaying it on the weather station’s server is quite clear from the program code (I’ll just emphasize that it’s important to convert JSON objects after parsing the API server response into a type suitable for processing and output – here, the JSON.stringify() method of the Arduino_JSON library came in handy), so I’ll just provide a screenshot with the result:

The elementary home weather station I built allows for connecting more sensors. You can also add an independent power source and place the circuit in a nice enclosure. You might also be interested in Raspberry Pi + GPS module: sending weather forecasts based on coordinates to Telegram and Raspberry Pi with Radio-Frequency Identification (RFID).